Manage Queues
Enhance the caller experience in the Admin Portal by creating and managing call queues. Call queues organize and prioritize incoming calls, ensuring efficient routing and improved service. This setup helps reduce wait times and provides a smoother experience for your callers.
Create a New Queue
To create a new queue, follow these steps:
- Log in to the Admin Portal.
- Navigate to Features > Queues in the left-side menu.
- Click the New button located in the top blue bar.
A pop-up window will guide you through the queue configuration process, offering several options to customize your new queue:
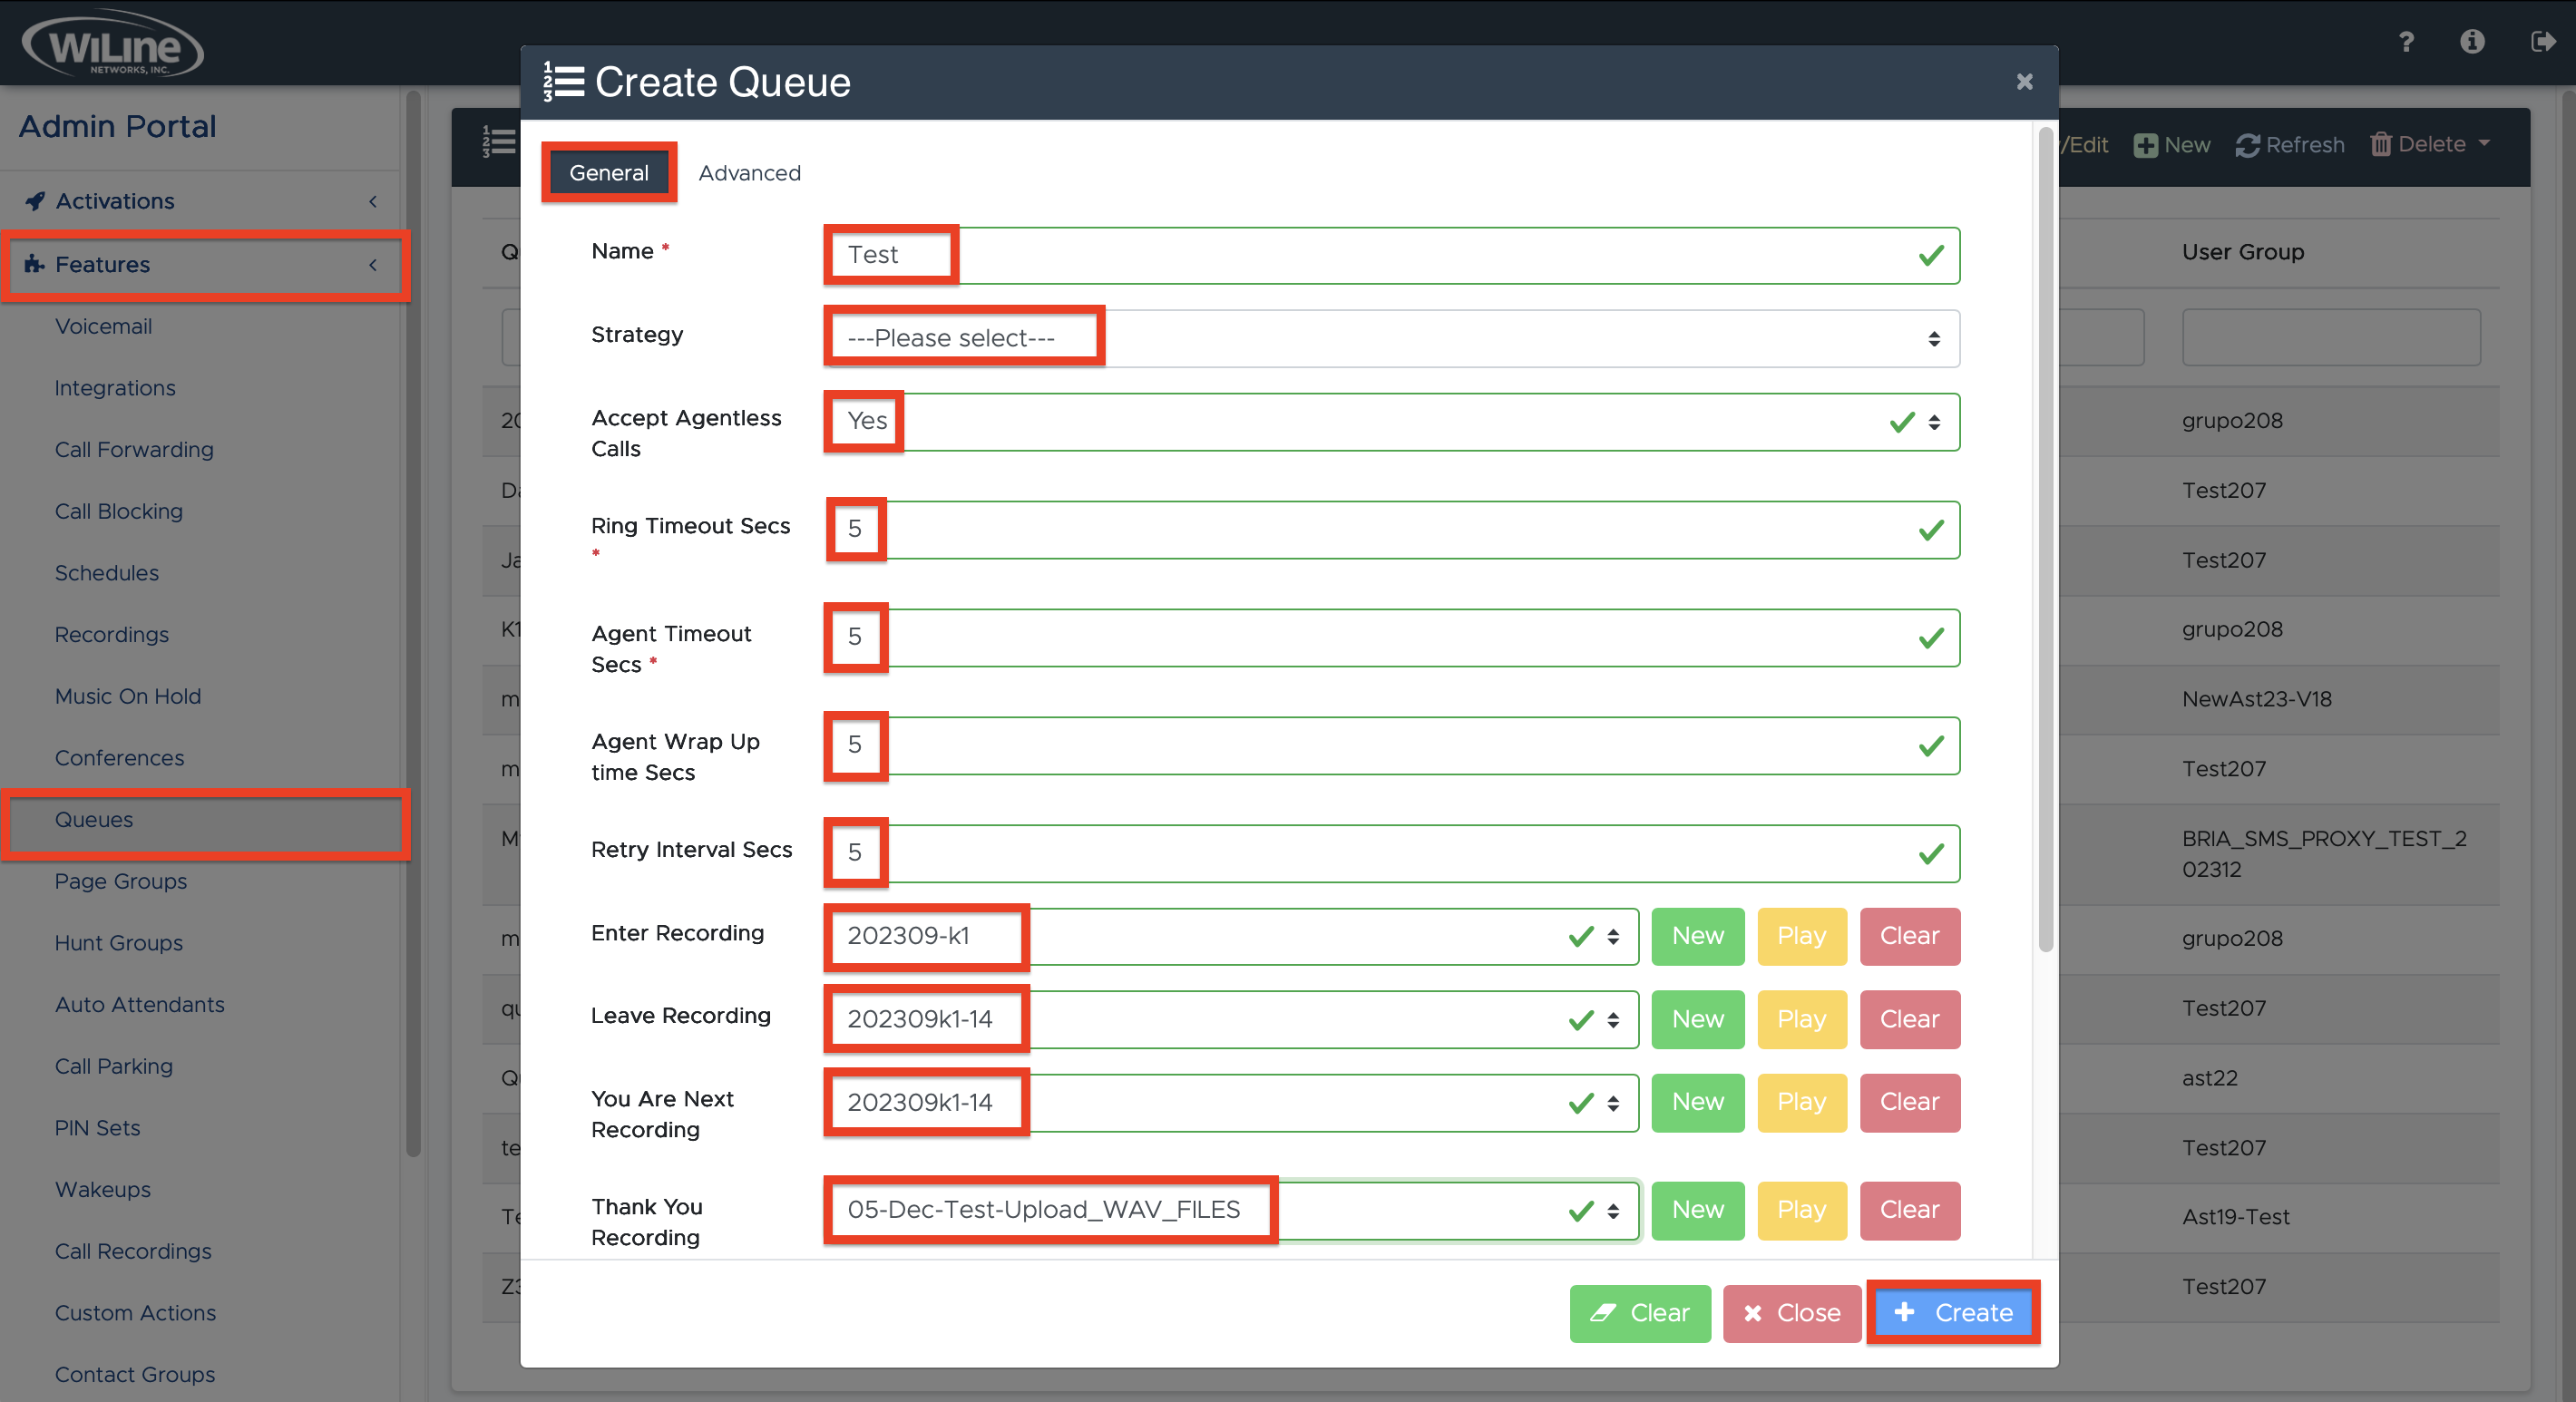
Set Up a General Queue
In the General tab, configure the following settings:
-
Name: Enter a unique name for your queue.
-
Strategy: Select a call distribution strategy from the dropdown menu:
- Ring All: All agents receive the call simultaneously.
- Round Robin: Calls are distributed evenly among agents.
- Fewest Calls: Calls are directed to the agent with the fewest answered calls.
- Least Recent: Prioritizes agents who have not recently answered a call.
- Random: Randomly assigns calls to agents.
-
Accept Agentless Calls - [NEW]: Choose whether this queue accepts calls without an assigned agent. You can select one of the following options:
-
strict – Callers cannot join a queue with no members or only unavailable members.
-
yes – Callers can join a queue with no members or only unavailable members.
-
no – Callers cannot join a queue with no members.
importantIf set to strict, when the last agent logs out and calls are queued, incoming callers will immediately be removed from the queue, and the queue call will return. This helps prevent calls from being stuck in a queue with no available agents.
-
-
Timeout Settings: Enter values for the mandatory fields in seconds (Secs):
- Ring Timeout: Duration before a call times out if not answered.
- Agent Timeout: Duration an agent has to answer the call.
Optionally, you can also enter:
- Agent Wrap Up Time: Time agents need after a call to complete necessary tasks.
- Retry Interval: Time to wait before retrying to reach the next available agent.
-
Recordings: Select recordings to use for your queue:
- Enter Recording: Greeting for callers joining the queue.
- Leave Recording: Message for callers placed on hold.
- You Are Next Recording: Notification for callers about their position in the queue.
- Thank You Recording: Closing message after call resolution.
- Periodic Announcement: Messages played at regular intervals (in seconds).
noteTo upload a new file, click en New. A window will guide you through the process, as outlined in the Recordings section. To listen to a recording, click Play, or click Clear to delete it.
-
User Group: Select a User Group from the dropdown to assign to this queue.
-
Add Members: Choose users from the dropdown menu and click Add to include them as members of the queue.
To finalize your queue setup, click Create. To erase all data and start fresh, click Clear in the bottom left corner. If you decide against creating a new queue, click Close.
Set Up an Advanced Queue
In the Advanced tab, configure the following settings:
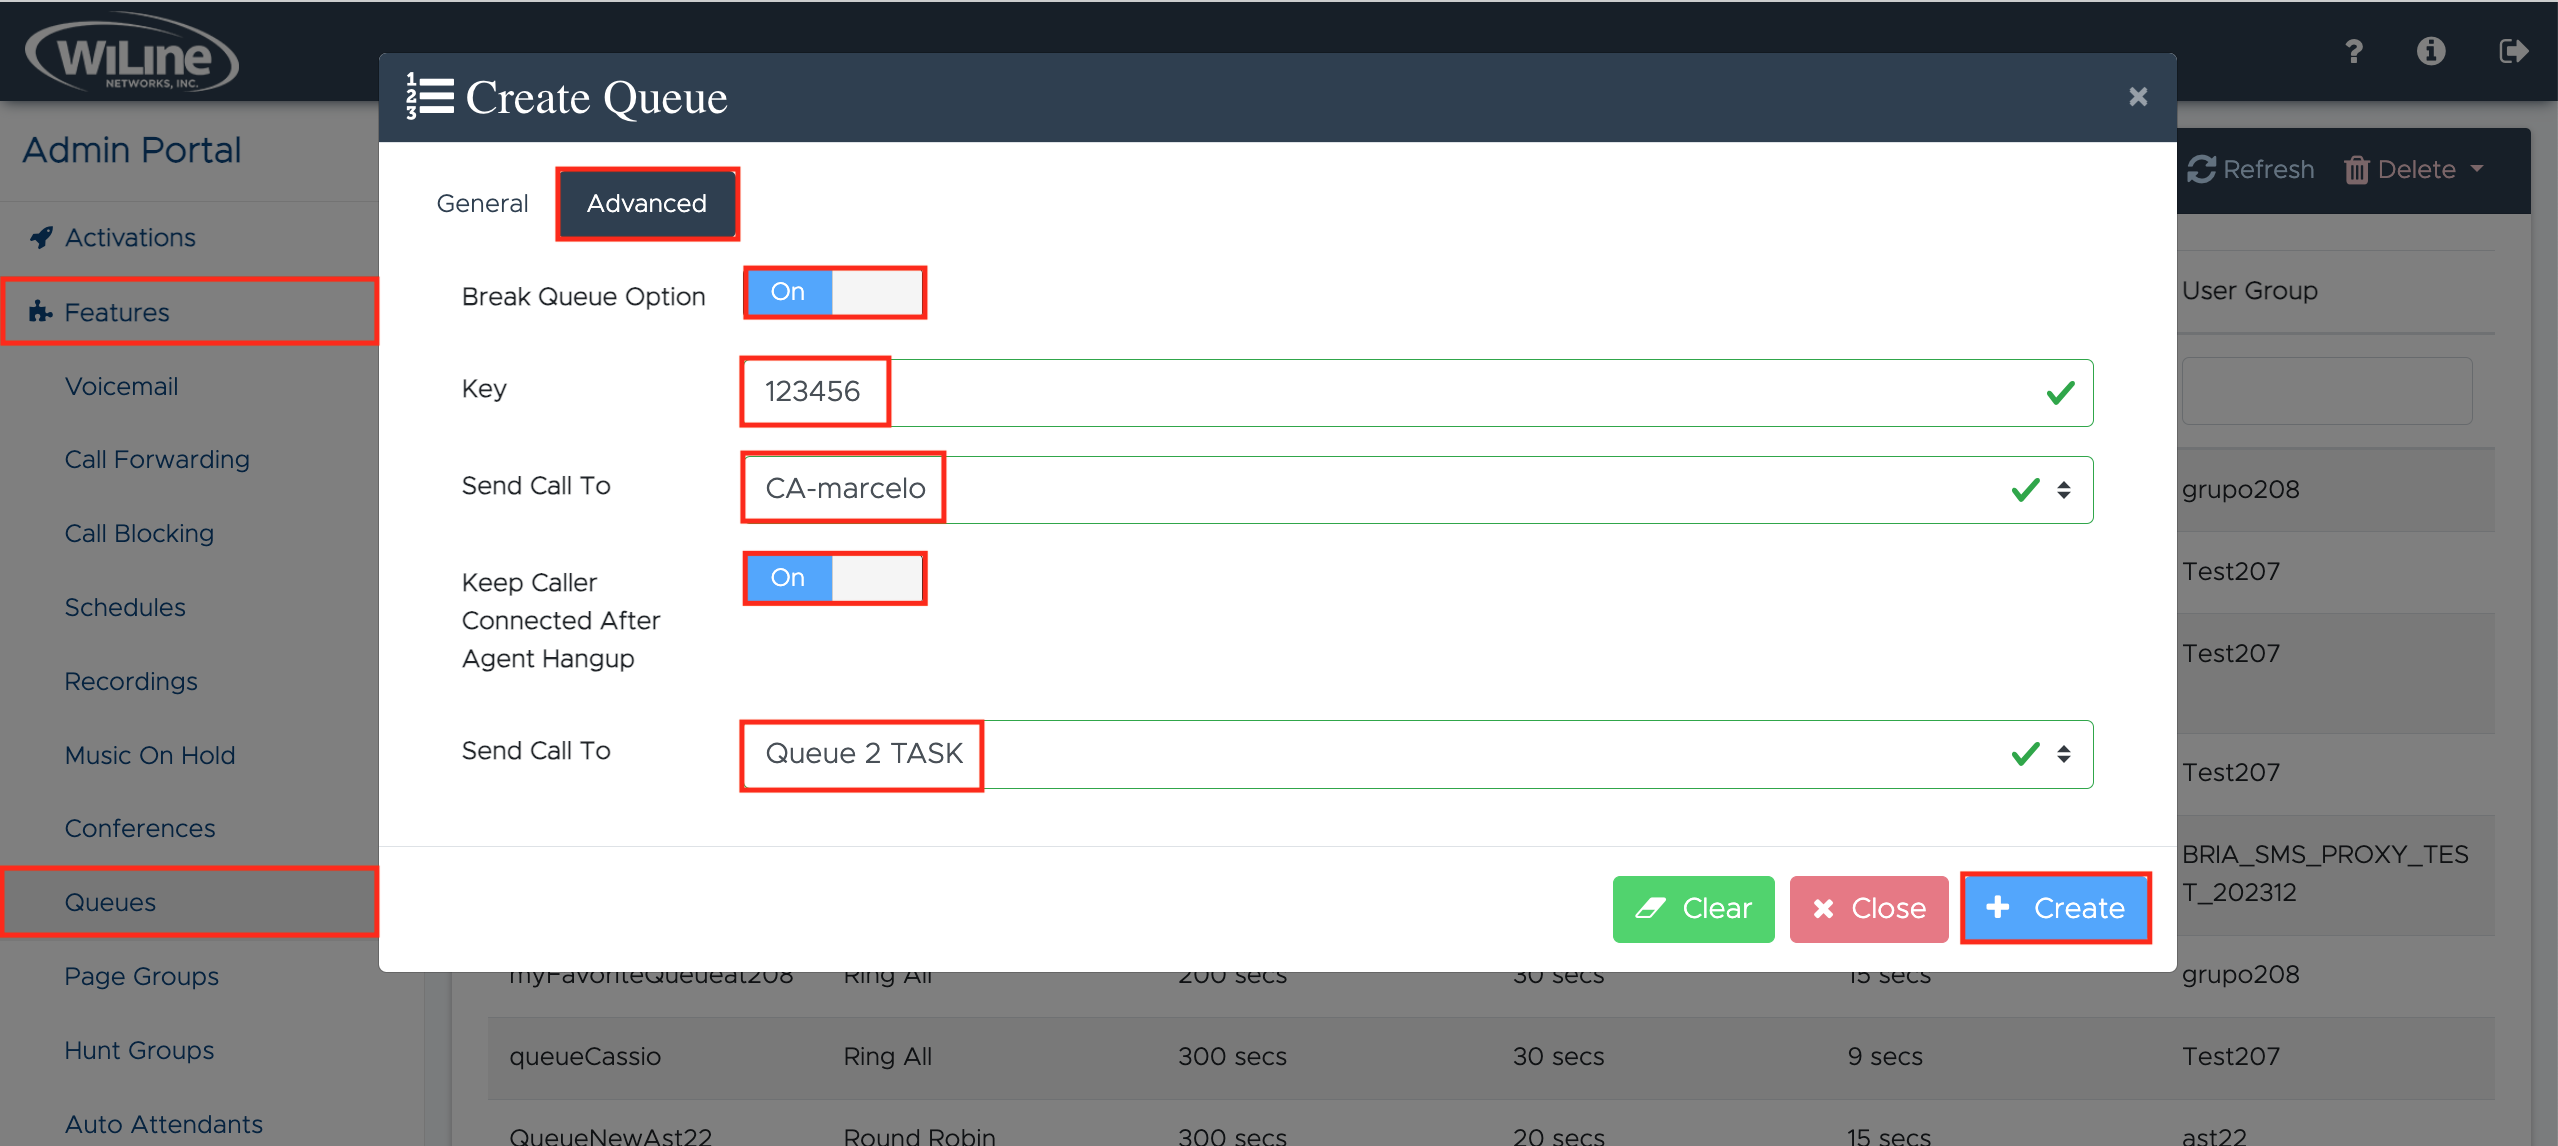
- Enable Break Queue Option to allow callers to exit the queue by pressing a designated key.
- Enter a Key that callers can press to leave the queue (e.g., a number on the dial pad).
- Send Call To: Select a user from the dropdown list to route the call.
- Enable Keep Caller Connected After Agent Hangup to maintain the call even after the agent disconnects.
- Use Send Call To again to choose another user or group for additional routing flexibility.
To complete the advanced queue setup, click Create. To erase all data and start over, click Clear. To cancel the process, click Close.
View Your Queues List
To view the list of your queues:
- Log in to the Admin Portal.
- Navigate to Features > Queues from the left menu.
A list of all your created queues will appear on your dashboard:
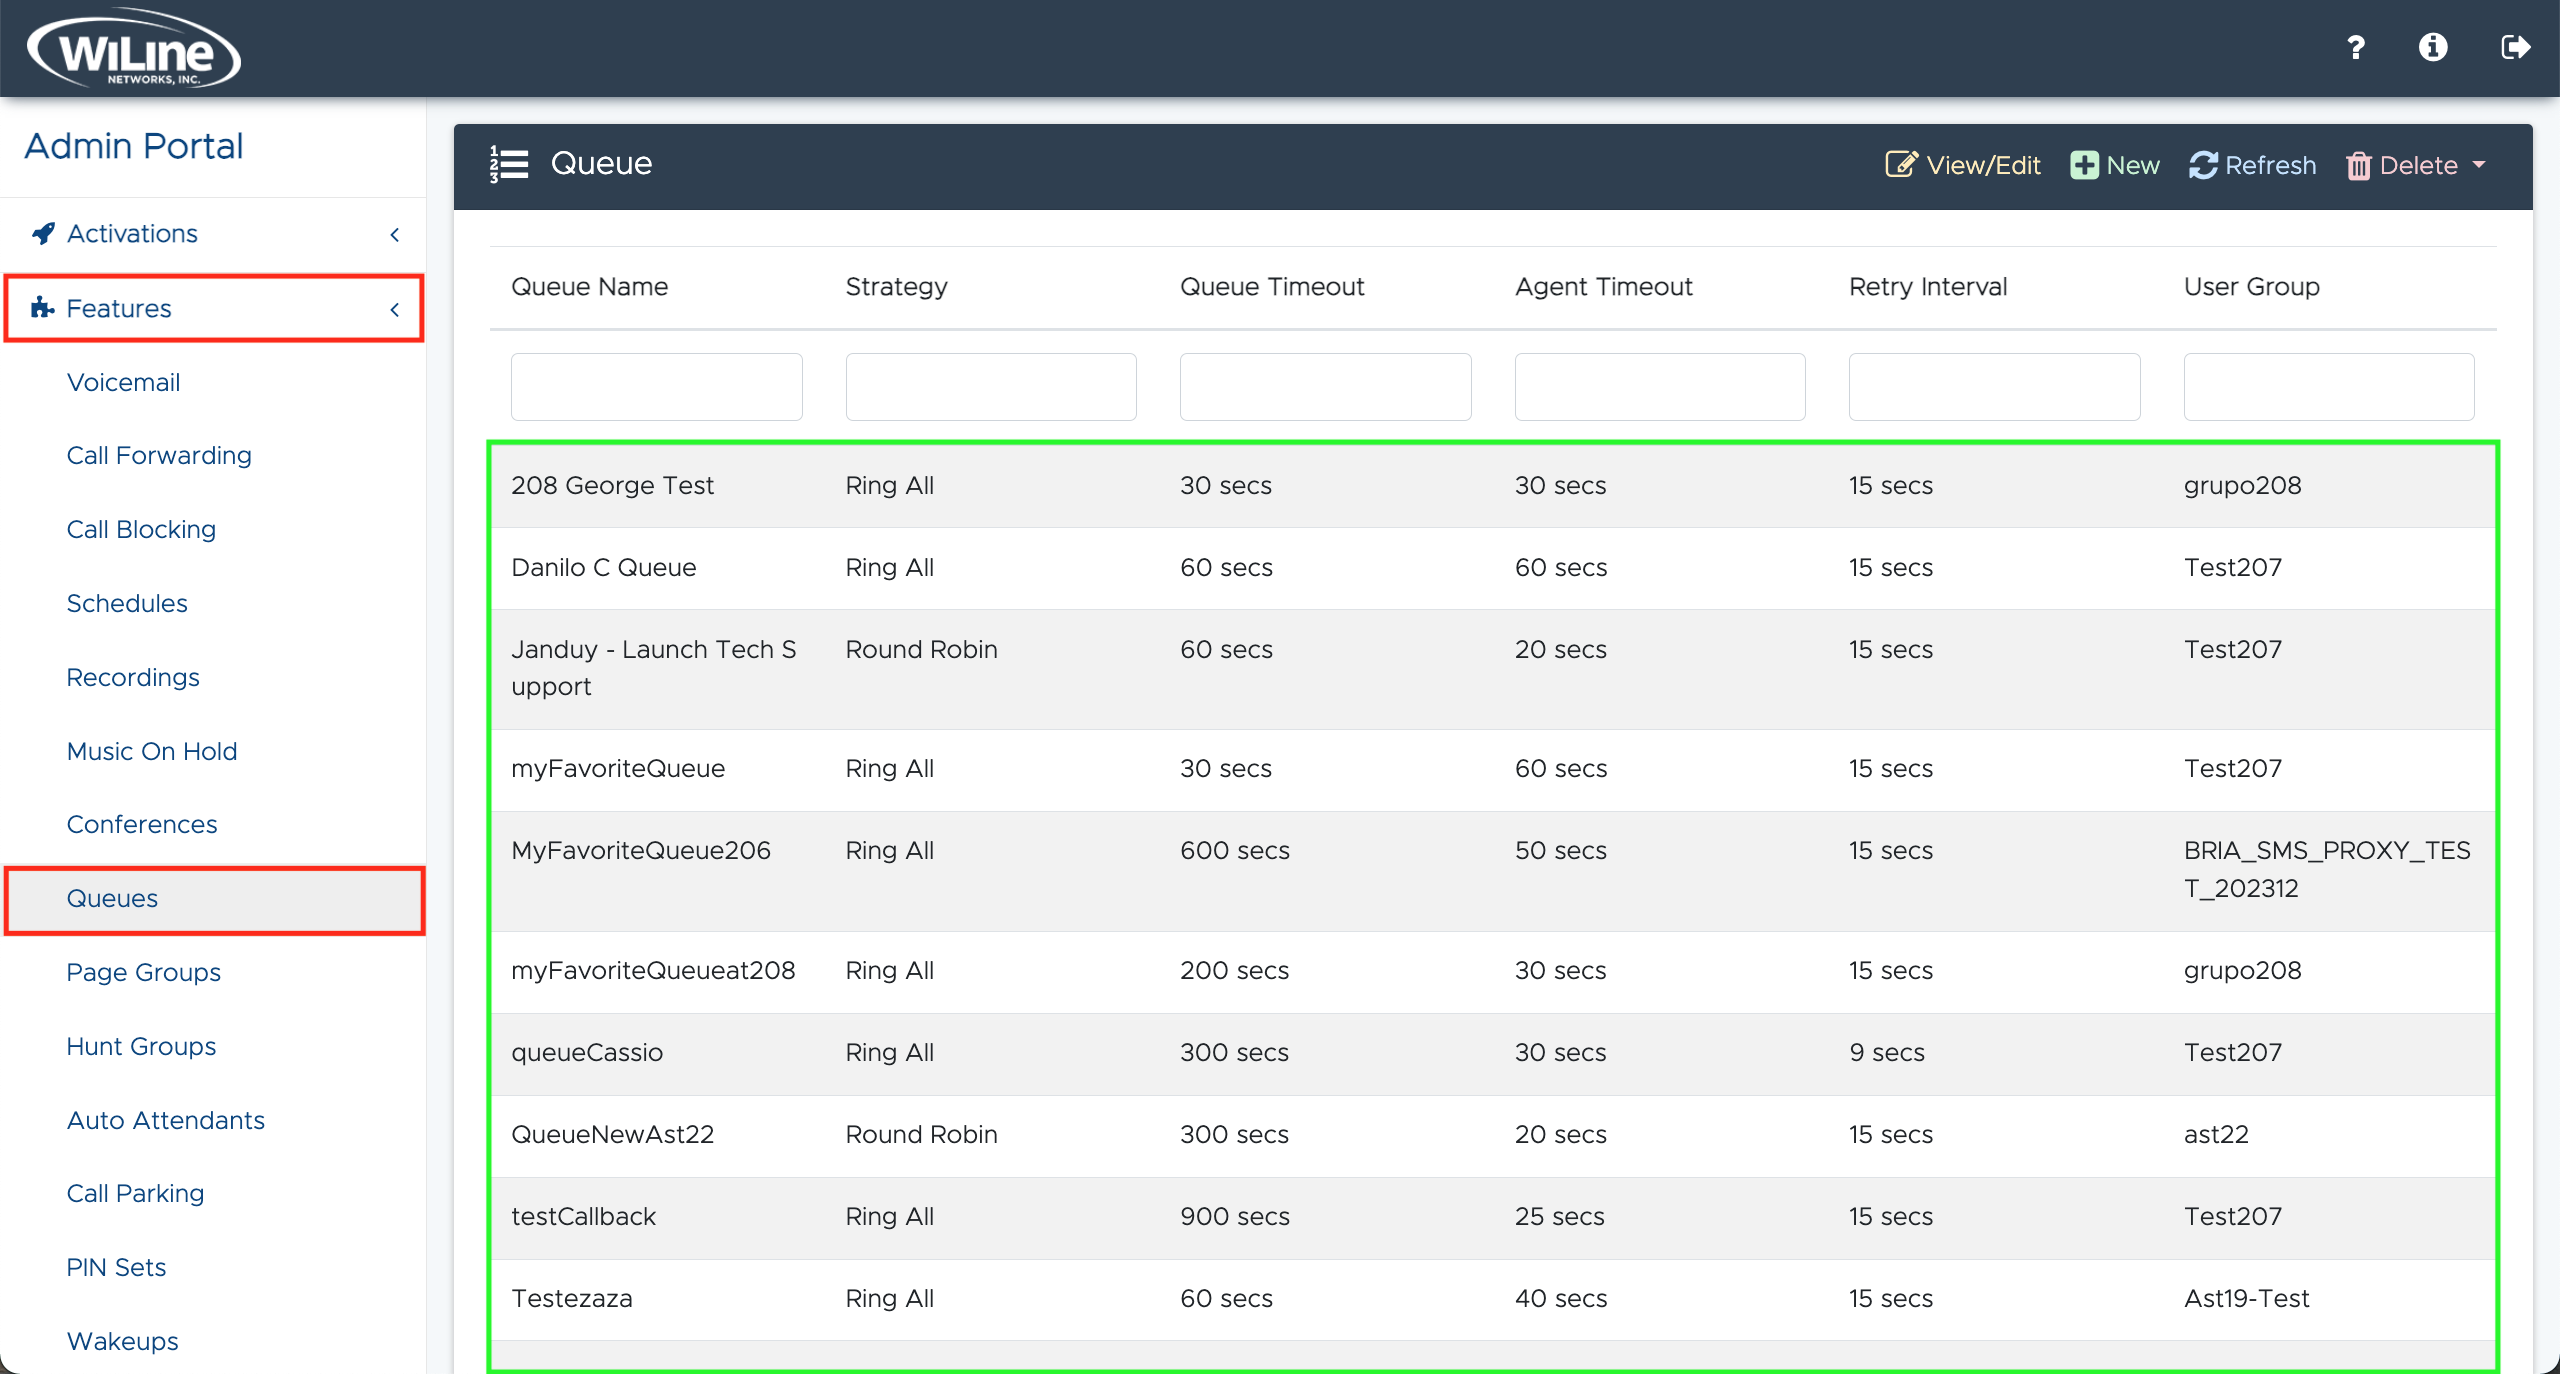
To filter or search for specific queue items, simply enter text in the fields corresponding to the column headers (e.g., Queue Name, Strategy, Queue Timeout, etc.).
Edit a Queue Item
To edit a queue:
- Double-click a queue from the list, or
- Select a queue and click the yellow View/Edit button in the top blue bar.
An Edit Queue pop-up window will open, allowing you to modify the item's details.
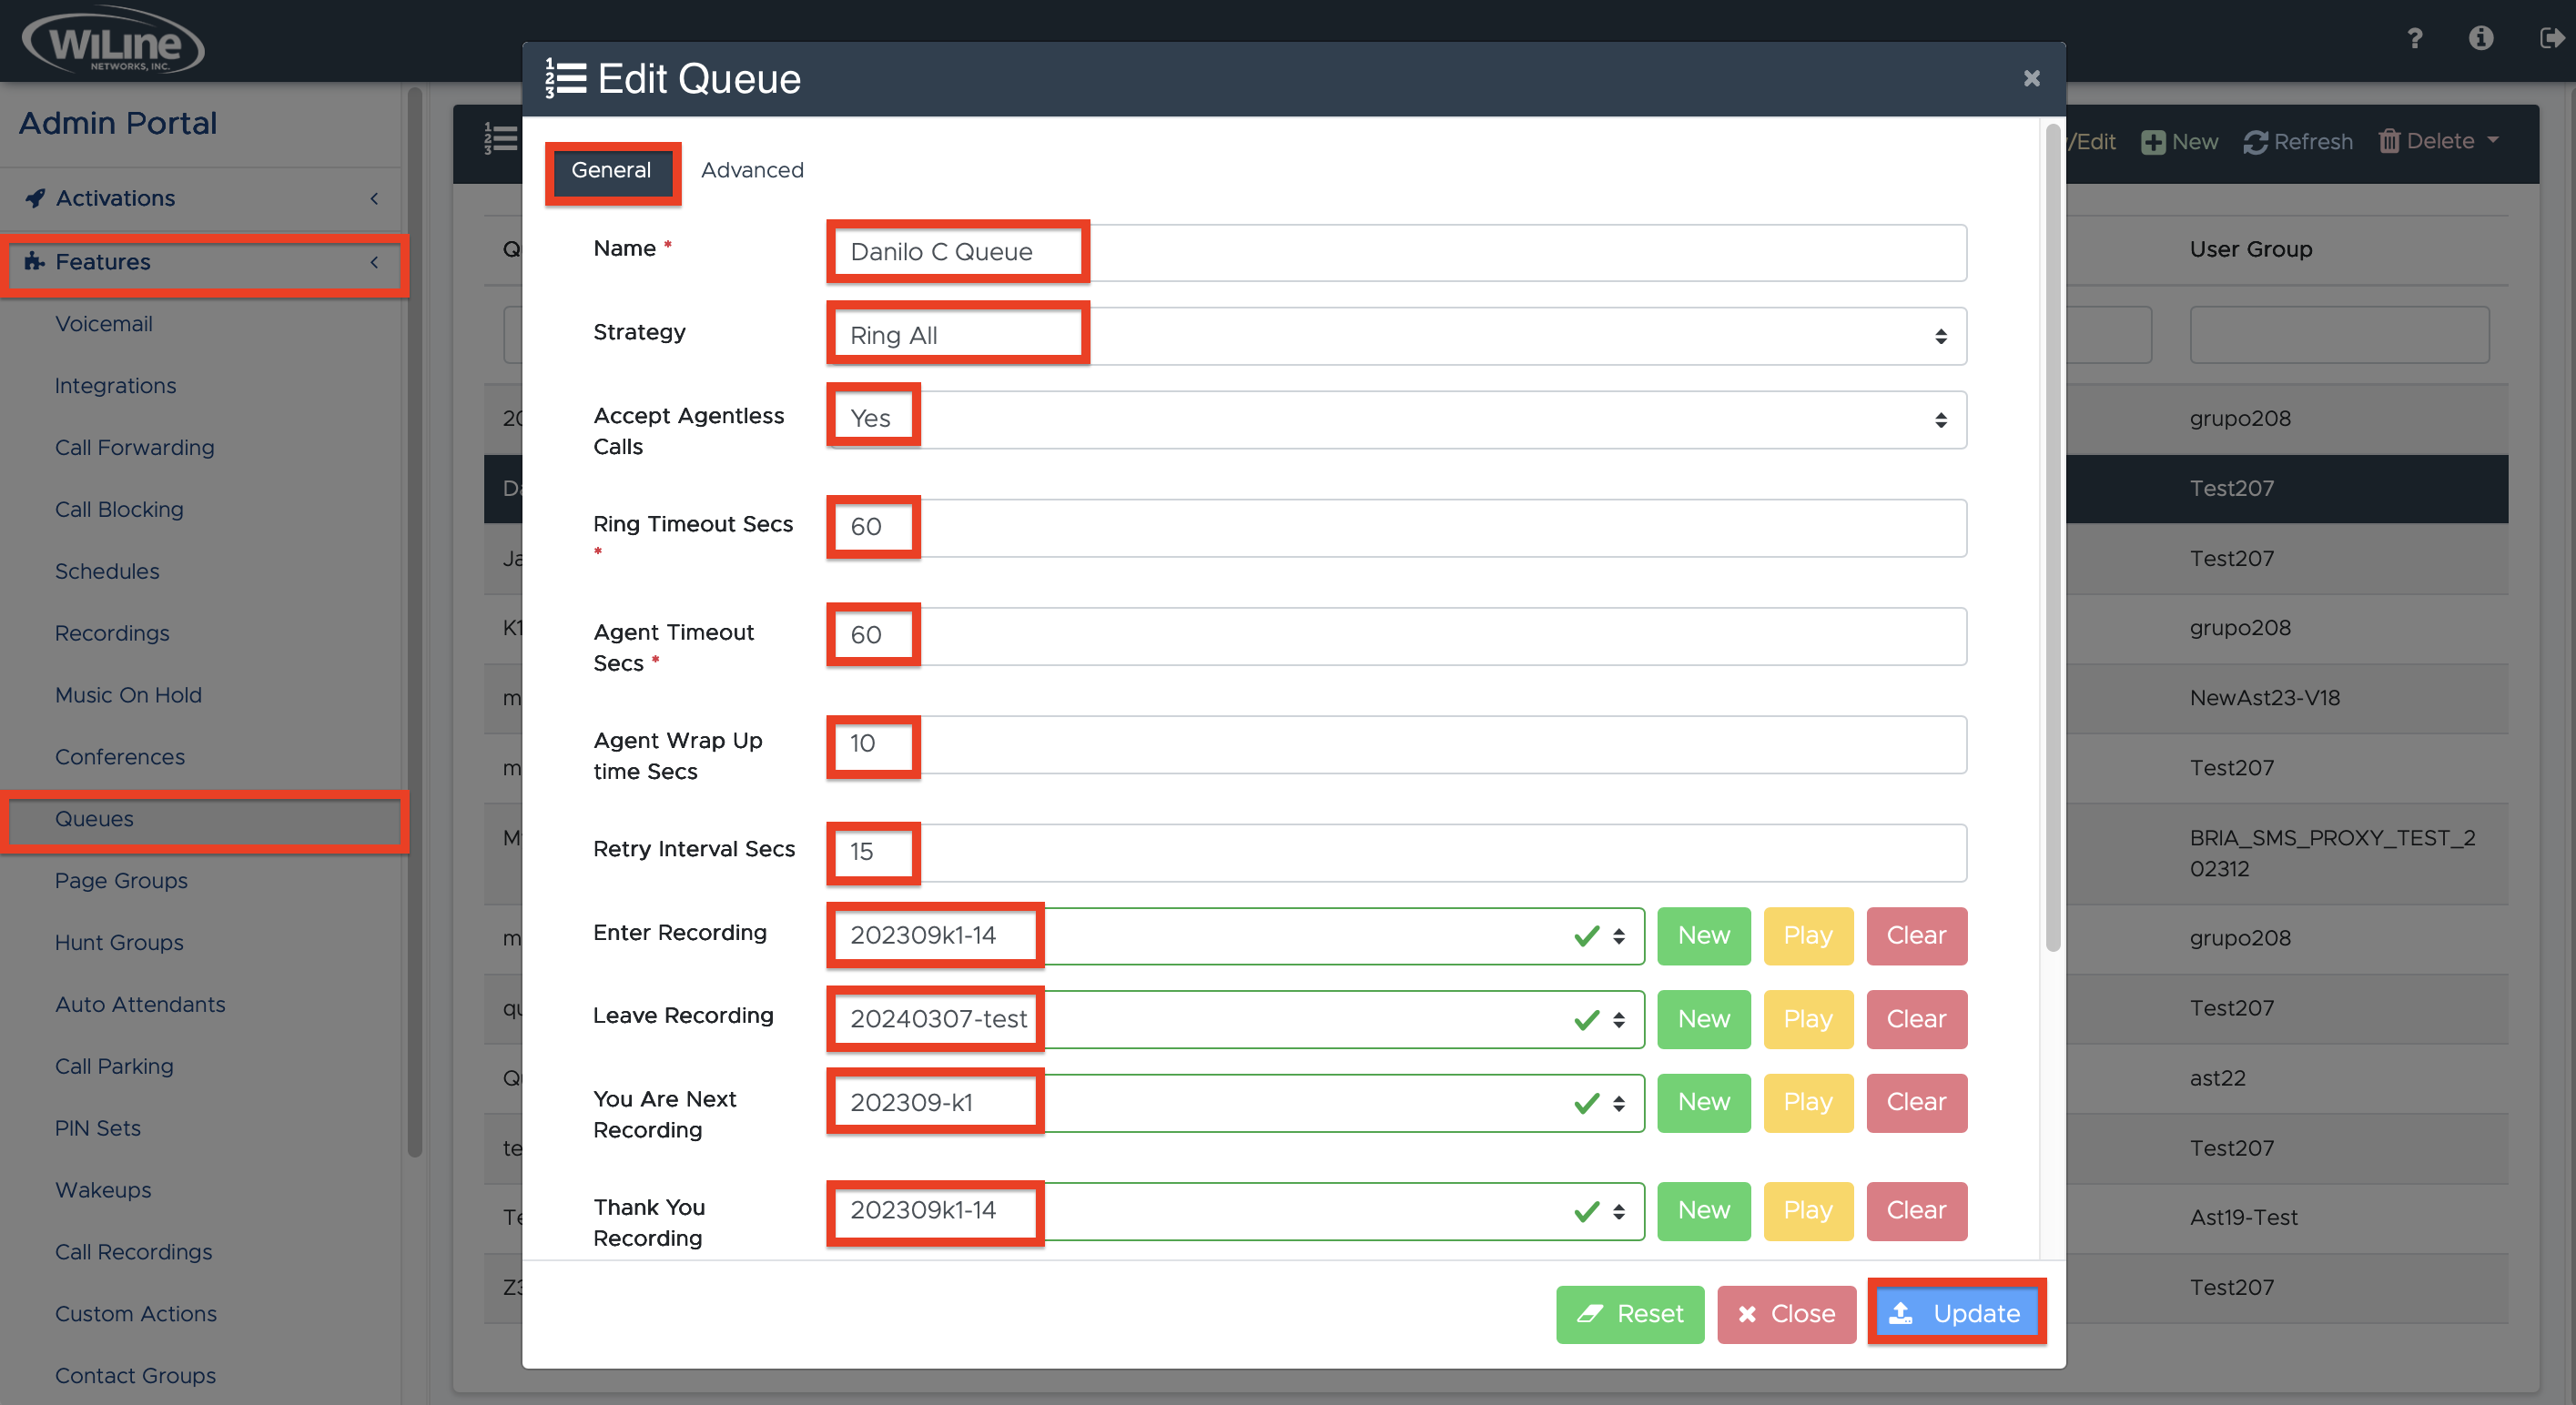
General Queue Setup
In the General tab, configure the following settings:
-
Name: Enter a unique name for your queue.
-
Strategy: Select a call distribution strategy from the dropdown menu:
- Ring All: All agents receive the call simultaneously.
- Round Robin: Calls are distributed evenly among agents.
- Fewest Calls: Calls are directed to the agent with the fewest answered calls.
- Least Recent: Prioritizes agents who have not recently answered a call.
- Random: Randomly assigns calls to agents.
-
Accept Agentless Calls - [NEW]: This option controls whether the queue accepts calls when no agents are currently available or assigned. You can select one of the following options:
-
strict – Callers cannot join a queue with no members or only unavailable members.
-
yes – Callers can join a queue with no members or only unavailable members.
-
no – Callers cannot join a queue with no members.
importantIf set to strict, when the last agent logs out and calls are queued, incoming callers will immediately be removed from the queue, and the queue call will return. This helps prevent calls from being stuck in a queue with no available agents.
-
-
Timeout Settings: Enter values for the mandatory fields in seconds (Secs):
- Ring Timeout: Duration before a call times out if not answered.
- Agent Timeout: Duration an agent has to answer the call.
Optionally, you can also enter:
- Agent Wrap Up Time: Time agents need after a call to complete necessary tasks.
- Retry Interval: Time to wait before retrying to reach the next available agent.
-
Recordings: Choose recordings for your queue:
-
Enter Recording: Greeting for callers entering the queue.
-
Leave Recording: Message for callers placed on hold.
-
You Are Next Recording: Update on the caller’s position in the queue.
-
Thank You Recording: Closing message after call resolution.
-
Periodic Announcement: Messages played at set intervals (in seconds).
noteTo upload a new recording, click en New. Refer to the Recordings section for guidance on file uploads. Click Play to listen or Clear to remove a recording.
-
-
User Group: Select a user group to associate with this queue.
-
Add Members: Choose users from the dropdown and click Add to include them in the queue.
To finish, click Create. To reset, click Clear. To cancel, click Close.
Advanced Queue Setup
In the Advanced tab, configure additional options:
- Enable the Break Queue Option to allow callers to exit by pressing a specified key.
- Enter a Key that callers can press to leave the queue (e.g., a dial pad number).
- Send Call To: Choose a user to route calls to.
- Enable Keep Caller Connected After Agent Hangup to maintain the connection even if the agent hangs up.
- Use Send Call To again for further routing options.
To save your changes, click Create. Click Clear to reset, or Close to cancel.
Delete a Queue Item
To delete a queue, follow these steps:
- Select the queue from the list.
- Click the red Delete button in the top blue bar.
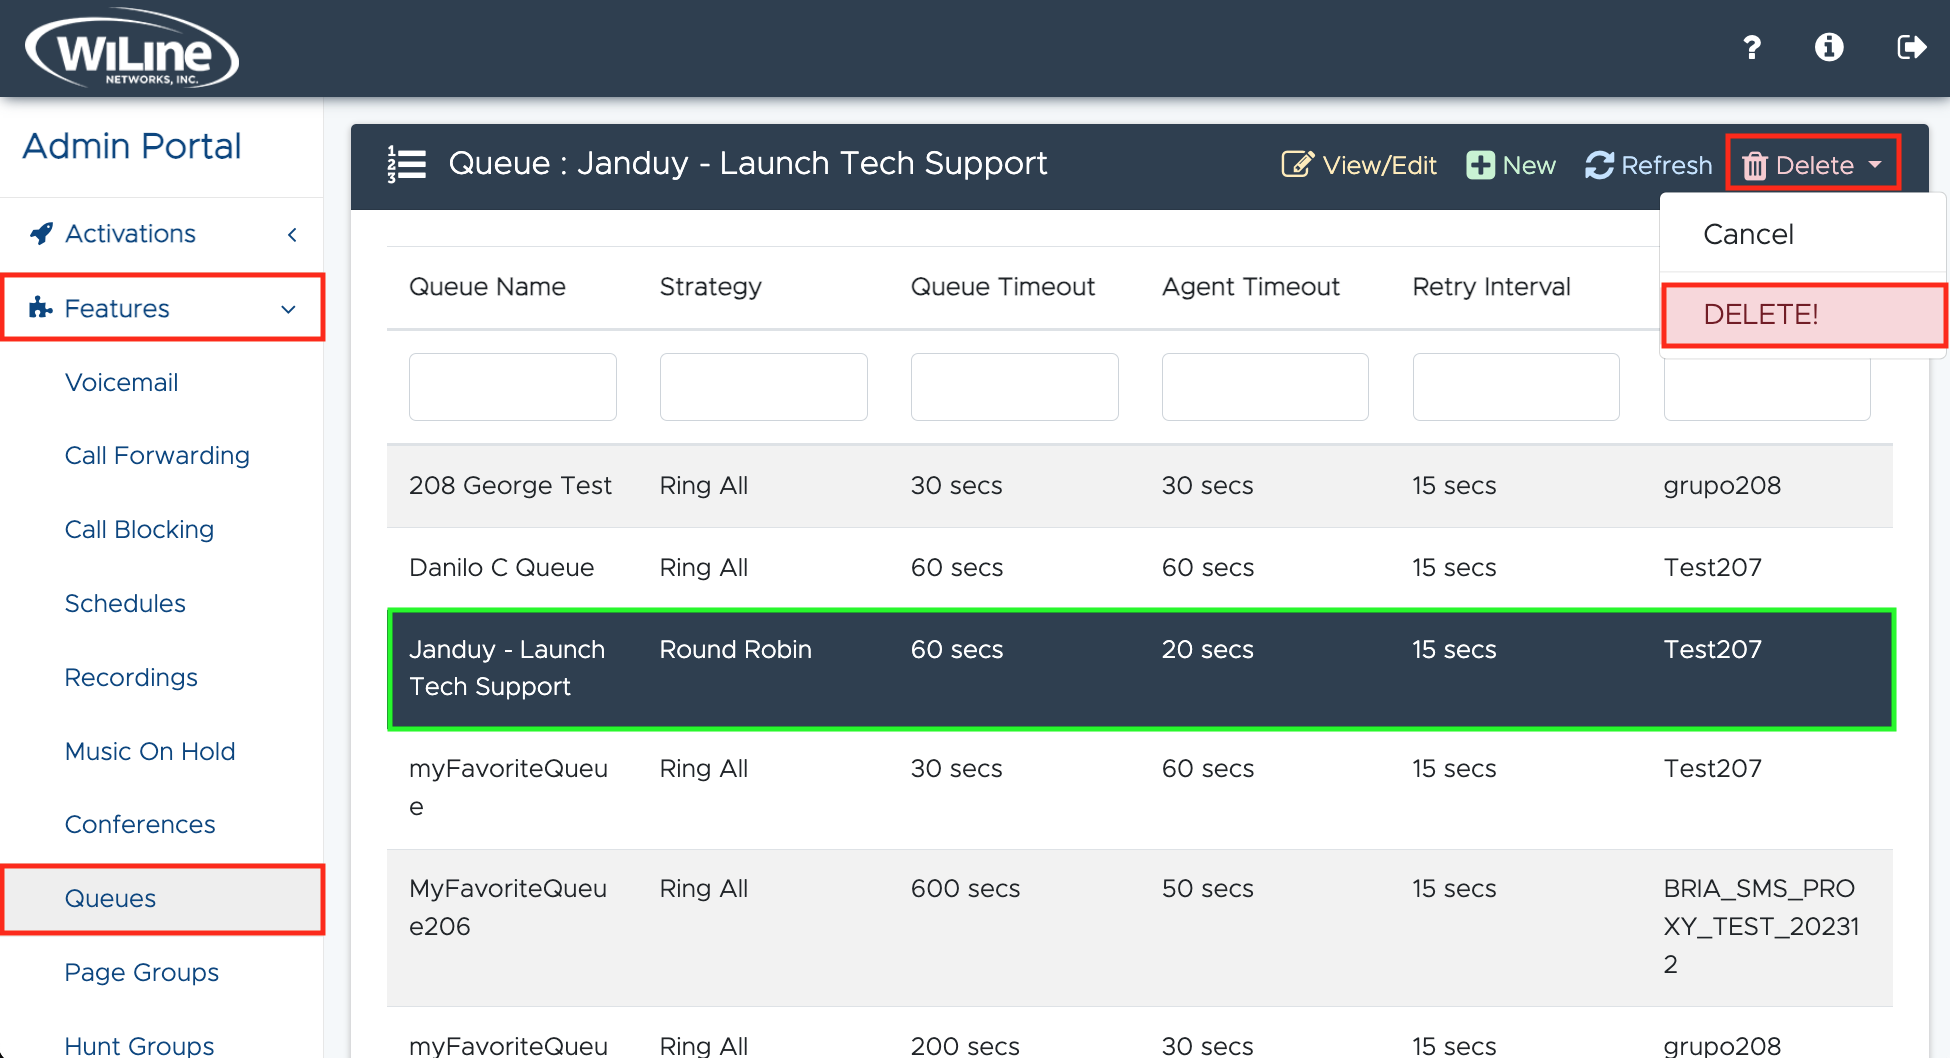
A confirmation pop-up will appear. Click Delete to confirm, or Cancel to return to the queue list.
You can only delete queues that you created.
By effectively managing your queues through the Admin Portal, you can optimize the caller experience, ensuring calls are handled efficiently and professionally. These settings enhance control over call management and provide various options for caller interaction.